What’s the Difference Between Data, Analytics, Insights and Why Should I Care?

I’ve spoken at and have attended quite a few conferences during my career. One major theme that speakers and conference goers continually talk about is analytics, data and generating insights from both. It’s not uncommon to hear speakers lecture on the need to focus on data and how data is going to be the future of marketing.

While they are not wrong, many times speakers and leaders confuse data, analytics, and insights and use them interchangeably. This happens so frequently that we often forget that these three topics are very different and how we go about thinking about them within our businesses needs to be different as well.

So let’s explain the differences and how that information will help you propel your business forward.

Defining Data, Analytics, and Insights. What’s the Difference?

Data

Data is, simply put,  the points along the road. Data by itself is relatively useless without context. It doesn’t really help with our understanding of what is going on when we only look at a singular data point but collectively, it can help us see patterns we would have never seen otherwise.

You can’t optimize or extract knowledge from something that you’re not measuring. Every business is going to collect data differently because they all have different needs and will be focused on different objectives. Asking the question “what is important to our business” is a starting point that will help guide you in trying to figure out what data to collect.

Another thing to pay attention to is the context of the data that you are gathering. Data without context can easily lead to bad decisions because it won’t reflect the reality of what’s going on with your business.

Analytics

Analytics is the process of discovering patterns and trends from the data. Business Dictionary states the goal of analytics is to help a company by “gaining knowledge which can be used to make improvements or changes.”

Individuals and businesses can’t really do anything without analytics. Useful analytics almost always comes from ratios. Single data points don’t provide much actionable information but when combined into a series of data points or ratios, trends become much easier to see and understand.

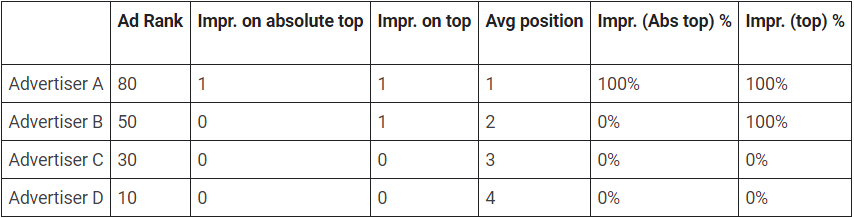
If your website receives 30,000 page views a month, is that good? Is it bad? Are you improving or do you need a website overhaul? Just looking at that single data point does little to help you understand almost anything about your website performance. But if you look and see that you have improved your monthly site traffic by 25% year over year or 10% month over month? That helps you understand a little bit more about whether or not your efforts have been effective.

Segmentation

Once you start looking at your analytics, make sure to start segmenting your analytics. As you start to put like-minded customers/visitors together, it will help you with the next section that we are going to go into which is insights.

The purpose of segmentation is to better understand your customers and individuals who interact with your company. Segmentation allows you to reduce the number of variables when it comes to your data so that you have a better context to understand the analytics.

A few examples of possible segments that you can do for your business are:

• Visits originating only from direct traffic and utilizing Chrome as their browser
• Customers who have the highest CLV (customer lifetime value)
• Visitors who remained on your site for longer than “x” minutes.

Insights

The most difficult part of dealing with data and analytics is simply just trying to understand what it is that you are observing. How are your customers actually behaving? What do they really want to know more about? How do they actually interact with your business? Analytics could be telling you a million different stories but insights is the process of understanding the true story of what is going on with your business and your customers.

Another way of framing this, every business can be viewed as a complicated mesh of different systems. While we love to think that we all understand exactly how everything works, no one actually knows how everything works 100% of the time. Not the founder, not the CEO…no one understands it completely.

Because of this, there is a gap in an employee’s understanding of the business and how it actually works. With this framework in mind, insights helps individuals to bridge this gap between their understanding of how the system works and how it actually works.

Insights is the “ah-ha” moment when data and analytics come together into a cohesive story that allows you to better see the reality of what’s going on with your business.

Remember, reporting does not equal insights. Reporting is the process of organizing data into summaries. Insights is the result of exploring data and reports in order to extract meaningful information to improve business performance. Reporting translates raw data into information. Analysis transforms data and information into insights.

Investigating the “that’s funny…”
Isaac Asimov captured the spirit of discovering insights perfectly when he said: “The most exciting phrase to hear in science, the one that heralds new discoveries, is not ‘Eureka!’ but ‘That’s funny…’”

As I mentioned earlier, the biggest issue businesses face when it comes to data and analytics is the gap between how they think the business runs and how it actually runs. These ‘that’s funny’ moments allows us to see areas where we are blinded by our own assumptions or previous experiences that we have had with the business. They allow us to step back and say to ourselves “we really need to look at this process because clearly something is going on here.”

How to turn Data into Insights

So now that we have all of the definitions out of the way, how do I actually pull insights from the data that we are collecting? Here are some useful tips to help you accomplish this goal.

• Ask yourself “what questions do we need to answer in order to succeed?”
• Create a specific hypothesis prior to running an analyse.
• Start with small data, filter and segment those data to build larger segments.
• Work on a single problem at a time.
• Break complex systems into smaller pieces.
• Ask specific questions. Generic questions will produce generic answers.
• Measure loss/gain caused by your findings.

Hopefully you found these tips on the difference between data, analytics and insights helpful.

Need help finding insights for your business? Want us to help? Contact our team today!

Google Ads Average Position is Going Away… Now What?

It wasn’t too long ago that Google announced they would be retiring the average position metric in September of this year, but many advertisers are still scratching their heads and wondering what to do in the meantime. Yes, Google rolled out top and absolute top impression share metrics, but many advertisers still rely on average position because it’s seems pretty straightforward (but we’ll get to that in a second) and more important it’s what they’ve been using for years. Change is one of the only constant things in the PPC industry, so what do advertisers need to know in order to seamlessly transition from average position to these newer metrics? Here are a few things you should understand and keep in mind.

Understanding the Differences

Average position, simply put, is your average ad position compared to other ads. Seems pretty simple, right? Hold that thought and we’ll get back to it.

Top impression share is the percentage of the time your ads are shown anywhere above the organic results. In other words, top impression share = Impressions on top/eligible impressions on top. If your ads are shown above the organic results every other time you would have a top impression share of 50%.

Absolute top impression share is the percentage of the time your ads are shown as the very first ad above the organic results. Absolute top impression share = Impressions on absolute top/eligible impressions on top. If your ads are shown above the organic results and as the very first ad every other time you would have a top impression share of 50%.

By its very nature, a percentage is a bit more nebulous than a number. Many of us can understand an average position of 2.2, but a search top impression share of 53.70%? That’s not as intuitive.

So what’s the difference? Average position only looks at where your ad is compared to other ads and the new metrics look at where your ad is compared to everything else on the SERP. You could have an average position of 1.0, but still not be above the fold. The metrics that are replacing average position should give you a better idea about where your ads are actually showing. Here’s a chart from Google that may help.

Average position chart

Are the New Metrics Better?

Technically, yes, I suppose they are. Otherwise, Google wouldn’t be getting rid of average position. However, I’m going to miss the simple, actionable insights you can gain from average position. Does average position paint the whole picture? No, but I’ve been using it for years and check it every time I get into one of my client’s accounts.

Maybe you’ve already transitioned to the new metrics, but if not, here are few ways you can start getting used to top impression share and absolute top impression share.

How to Use the New Metrics

First things first, Google’s automated bid strategies take the guesswork out of tweaking bids to optimize your impression share. There’s even a bid strategy that automatically adjusts your bids based on whether you want your ads to appear anywhere on the results page, at the top of the results page, or at the absolute top of the results page. If, however, you use manual bidding then you’ll need to understand how to use these metrics.

Top impression share big strategy

There are different schools of thought, but typically when I’m running a branded campaign I want to be the first ad. I would, therefore, adjust bids and/or budgets to maximize my absolute top impression share.

If I’m not running a branded campaign, I generally don’t want to be in the first ad position. I’ve found that although you usually get more clicks and a higher clickthrough rate, the increase in cost per click and more importantly cost per conversion isn’t worth it. In this case, I would focus more on top impression share. I don’t care about the absolute top, I just want to make sure my ads get seen.

How to Improve Impression Share

There are many different ways you can affect your impression shares, but I’m only going to cover some of the most common ones.

Budget – This one should be a no-brainer, the more you are willing or able to spend the more impression share you could have. That’s about all I have to say with this one.

Bids – At first glance, it would be easy to think that higher bids would always lead to higher impression share, but this is most definitely not the case. If you’re limited by budget then increasing your bids could actually lead to a decrease in impression share. Why is this? Higher bids usually lead to higher costs per click which means you’ll get even fewer clicks from your already strained budget. When you’re not limited by budget though, increasing your bids can be a great way to increase your impression share.

Quality score – This should come as no surprise, but a good quality score can dramatically improve the performance of your ads. When your ads consistently have high clickthrough rates, are relevant to the searcher’s query, and send the searcher to a well-designed landing page, Google rewards you. All things being equal, if you improve your quality score you will get a lower cost per click while at the same time increasing your ad rank. So your budget goes further and your ad appears higher in the SERPs, you’re killing two birds with one stone.

Final Thoughts

After reading this you should have at least a basic understanding of the differences between average position and the new top impression share metrics, how to use the new metrics, and a few ways you can improve your impression share. Using this information, I’d advise you to start incorporating top impression share and absolute top impression share into your routine campaign optimizations. You can continue to use average position for now, but remember – it’s going away in September.

Interested in a free Google Ads audit? Fill our contact form and we’ll be in touch!

DSLR Video Tips and Tricks

Video production on a budget can be difficult, especially when you need to produce a commercial-quality video. We don’t all have access to a $60,000 RED Cinema camera, so what do we do to produce high-quality content?

Many people have access to a DSLR camera, so we’ve come up with some tips and tricks on how to make a quality video with one.

Pre-Production

Research
Learning all you can about the upcoming project you’re working on is vital. Understanding the brand you’re working for (whether it’s a company or yourself) is important to first establish before continuing a project. Think of these three questions when you’re researching and preparing for your video:

1. What is the video trying to accomplish?

2. How have other people done it?

3. How can we do it better?

In the business of content creation, it’s about being aware of your purpose and accomplishing that in a creative, innovative, different way. Take time to strategically create a concept.

Create a Shot List
The angle of your shots and the way that you frame them all matter. Create with purpose and with a vision of the end result in mind. Have specific thoughts in mind. How are you going to balance each shot? The rule of thirds applies not only to photography but also cinematography. Pay attention to where your subject is and, if they’re going to move, where you will also move in order to keep them in frame.

Depth of field is another aspect of creating a shot that is important to think about. Referring back to the first question in the previous section, what is the video trying to accomplish? In some videos you might want the subjects and background completely in focus and, for other videos you may want one subject in focus and everything else blurry.

Scout the Area
Lighting
One of the most important things to pay attention to while you’re filming is lighting. Think about it, videography and photography are all about capturing light. Having good lighting is vital, but if it’s unavailable then you may want to consider bringing your own lights.

Space
Ideally, you’ll know the location of your shoot in order to properly plan out your shots and know what space is available. This isn’t always the case. There are a lot of times when online research is your best friend. Utilize your resources to learn as much as you can about the location of your shoot beforehand. In a lot of instances, you won’t be able to find out everything until you’re actually there. Budget time to see the space before you begin the production and make adjustments as needed.

Production

Lighting
Be intentional in your choice of lighting. Lighting creates a mood. Always have the purpose of your video in mind because that will help determine what subjects you want in certain lighting at specific times. These are likely decisions you’ll have to make for every video you’re shooting.

Focus
Keeping your subjects in focus at the right time is difficult, especially if you’re shooting a video with photography lenses. Keep in mind that photo lenses are varifocal. As the focal length moves, the focus moves as well. This change in focus is called “lens breathing,” and it’s something to keep in mind during production. If you have access to cinema lenses (or parfocal lenses), then shooting video will prove to be easier. Those lenses are designed to keep moving objects in focus as you zoom in and out because of the way they’re built. PetaPixel provides a good explanation and demonstration of the differences between varifocal and parfocal lenses.

Stabilization
One of the biggest drawbacks about shooting on a DSLR is fighting camera shake. As much as we wish we could all have perfectly steady hands, it’s not possible. Luckily, there are tools available like a steadicams and glidecams. Thes are more expensive options, but if you have the funds to purchase one they’re amazing.

A more DIY and budget-friendly option is to use the strap that comes with your camera, put it around your neck and extend it until it’s tight around your neck. Use both hands and hold the camera (one on each side). This creates three points of contact (like a tripod) and it becomes easier to stabilize the camera better than if you were to hold it free-hand.

Aperture
Knowing your settings on your camera are important. As you’re capturing your images, your aperture setting determines how much light is allowed to enter into the camera. Have the subject well-lit to have a smaller aperture.

The further open the aperture is the more light is allowed to reach the sensor, however, you create a shallow depth of field which makes your plane of focus smaller. It is harder to capture moving subjects and keep them in focus when your plane of focus is narrow.

A wide open aperture can create a beautiful shot with foreground and background items blurred and softened so adjust accordingly to available light and style of shot.

Camera Movements
Don’t take moving the camera for granted. Just because you can move it, doesn’t mean you always should move it. Have a very specific purpose to move the camera because as a videographer it’s your job to know when and where to move it. Those movements need to be smooth for post-editing, which is why creating a shot list is so important in pre-production.

Post-Production

Organize Folders in Premiere Pro
We prefer using Adobe’s Premiere Pro as our video editing software and it makes organizing your clips and audio files much easier. Having organized folders will make all the difference when editing your video. Utilize bins and groups and label them in a way that is organized and clear. A good tip is to label them in a way that if an outside person needed to find a clip, it would be easy for them to find it whether it be labeled by location, date, event, etc.

Here’s a tip on how to quickly organize your footage.

Post “Warp Stabilizer”
The warp stabilizer feature in Adobe Premiere Pro is one of your best friends, especially if you’re not using a Glidecam or a DSLR stabilizer for your video. This feature stabilizes shaky footage, which should give you a little sense of relief because now you know you don’t have to be perfect! Adobe provides a great tutorial on how to use the warp stabilizer feature.

Cut to the Music
Music can make or break a video, so it’s important to choose a soundtrack that fits the purpose of the video. One of the biggest pieces of advice we can provide {which takes some planning, but is worth it), is to choose your soundtrack before you create your video. Pre-determining your soundtrack allows for you to create your shot list and plan your cuts according to the track. It’s amazing how much more professional your video will turn out just by creating your video with a soundtrack in mind.

Keeping these ideas in mind will help you on your journey to creating high quality, captivating content. Don’t worry about creating the perfect video on your first try, practice makes perfect! Remember that competing with other content creators is no easy feat. Make sure to add your own style to your videos. Do something different, dare to be unique.